How to Share Google Drive: Share Files and Create Shared Drives in 2025
Sharing files and folders from your Google Drive has transformed from a curious and convenient novelty to a necessity. No matter who you are, a student sending out project blueprints or sharing your favorite meme collection (we don’t judge), or a C-level official at a multi-million company, you will have to share Google Drive and files, and knowing how to do it right is key. But wait – before you move on with this handy guide to mastering Google Drive sharing in 2025, let me ask you this: have you ever shared a contact list as easily as a file? No? Tools like Shared Contacts Manager make that dream a reality, saving you tons of time and headaches in the process.
Now back to the topic at hand—sharing files in Google Drive. While Google Drive makes file sharing relatively straightforward, it’s not without its quirks. From managing permissions to choosing the right sharing method, there’s a fine art to making sure your files land in the right hands (and not the wrong ones). In this guide, we’ll cover everything you need to know about sharing Google Drive in 2025, along with tips to keep your digital life organized and secure.
Share Google Drive VS Share Files
Google Drive offers two distinct sharing options: sharing individual files and folders or sharing your entire Drive. It’s like lending someone a book versus giving them access to your library. When we speak about sharing your data, the difference is more in control than it is in scale. Sharing a single file or folder means you’re handing over specific content while keeping the rest of your Drive off-limits which is critical for maintaining privacy in G Suite. This is perfect for school projects, one-off collaborations, or when Aunt Martha insists on seeing just the vacation photos and not your tax documents.
On the other hand, sharing your entire Google Drive is a riskier move. It’s best suited for scenarios like transferring ownership to a colleague, collaborating on a long-term project with an inner circle, or giving your team access to company resources. Here, you should be certain about what’s in your Drive before handing over the keys.
Now, let’s break down the practical steps for sharing files and folders.
Step-by-Step Guide to Sharing Google Drive, Files, and Folders
In this section, we’ll explore the different ways to share your Google Drive and explain how it differs from sharing individual files. Spoiler alert: the differences are real – and they’re pretty significant.
How to Share Your Entire Google Drive With Specific People
Google doesn’t let you share your entire drive with a single button click. Depending on how you look at it, this can be a blessing in disguise. It helps prevent accidental oversharing – imagine unintentionally giving someone access to all your files. Instead, Google requires you to take deliberate steps to share your drive, so that you’re fully aware of what you’re doing and the potential consequences.
To share your entire Google Drive, follow these steps:
- Log in to your Google account and open Google Drive.
- Click My Drive in the left-hand menu. Here, you’ll see all your folders and files, depending on how your drive is organized.
- Select everything. Press Ctrl+A (Windows) or Command+A (Mac) to select all the files and folders in your drive.
- Open the sharing menu. A toolbar will appear at the top of the screen, showing the total number of selected items. Click the first icon—a silhouette of a person with a plus sign—to open the sharing options.
- Set up sharing permissions. In the sharing settings window, enter the recipient’s email address. Google will also give you a chance to double-check which files or folders you’re about to share. Then, choose the recipient’s access role:
- Commenter: Can view and comment.
- Viewer: Can view files only. You can also set an expiration date for this access.
- Editor: Can view, comment, and edit. To set an expiration date for the Viewer role, click Add expiration.
- Send the invite. Once everything looks good, click Notify people (optional) and add a message if you’d like. Then, hit Send.
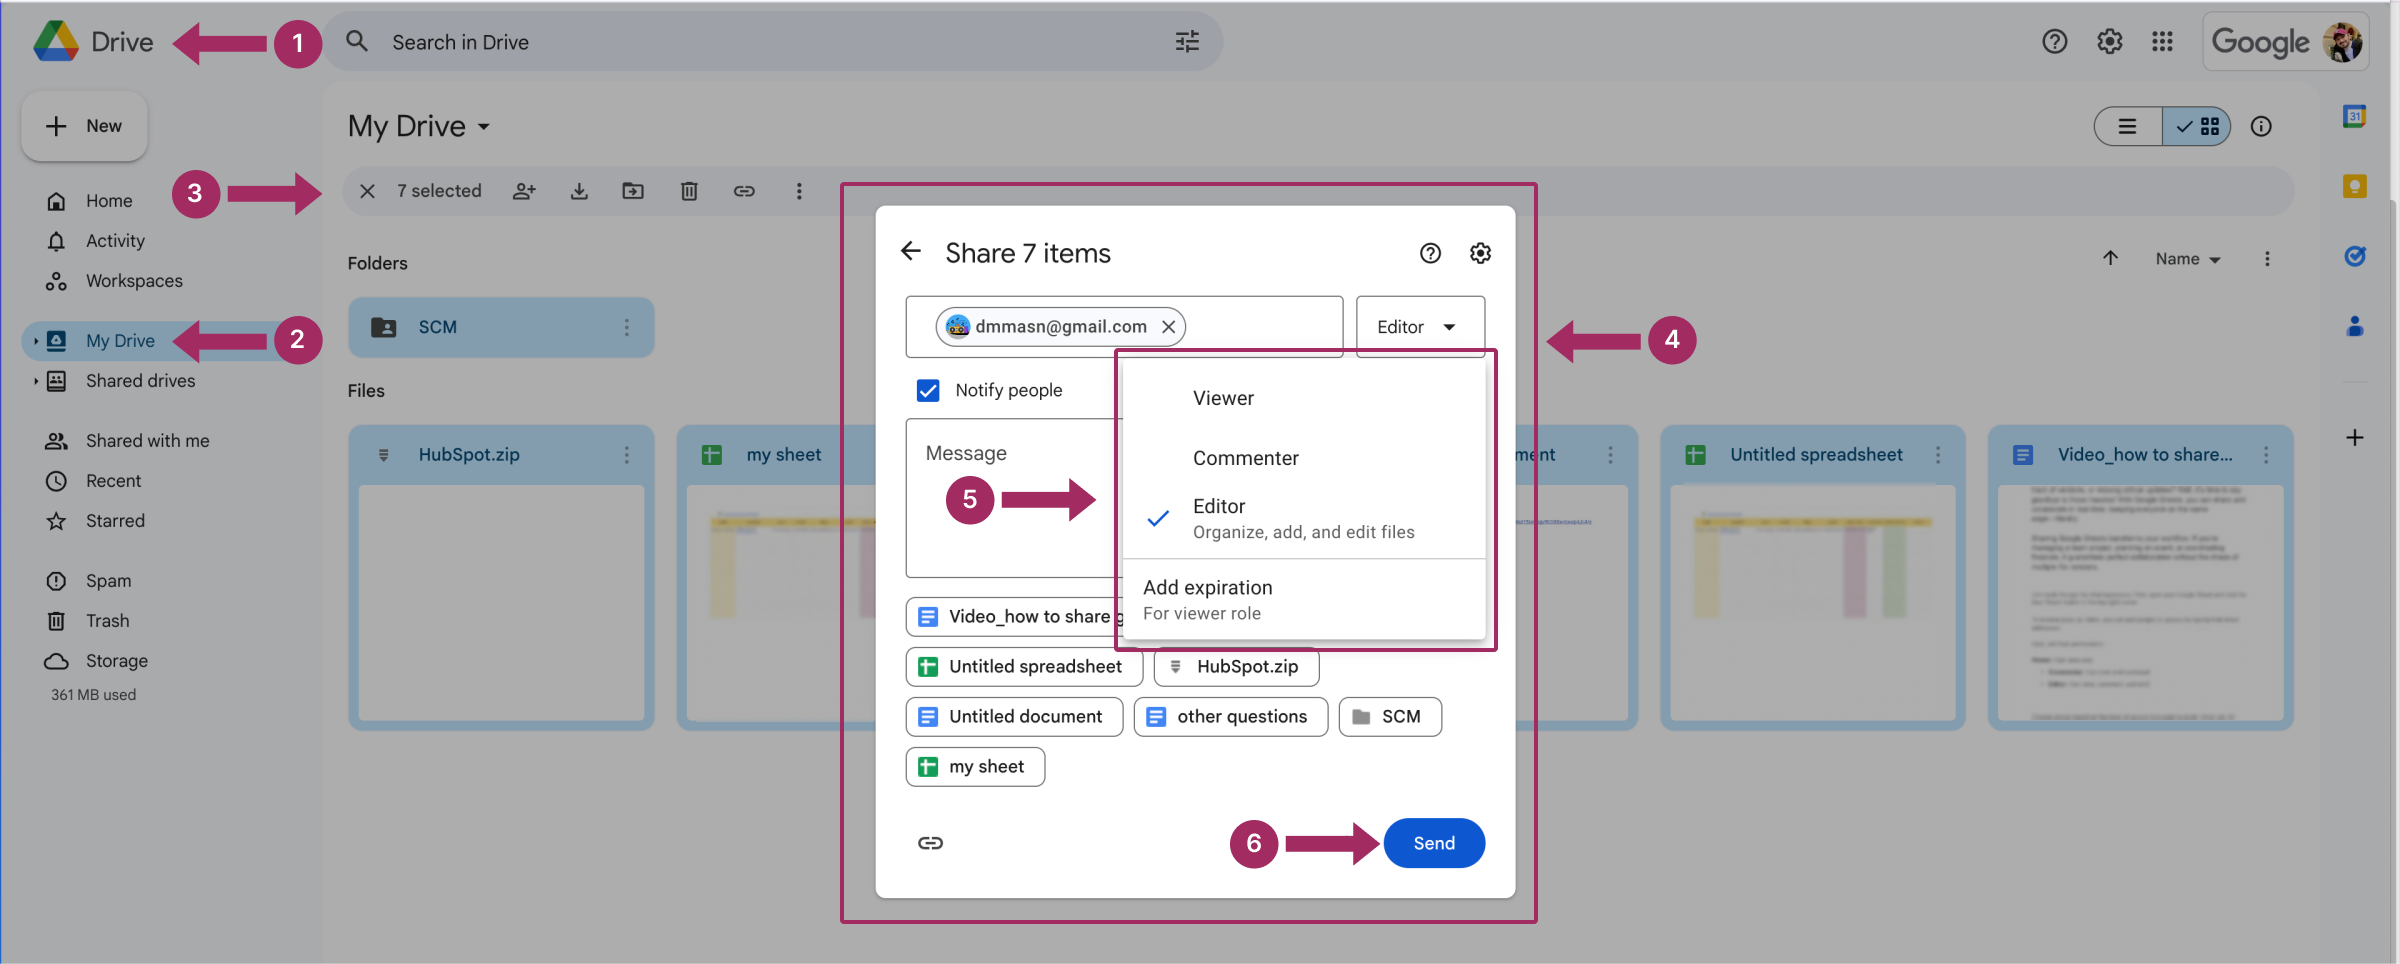
The people you’ve added will now have access to the files and folders you selected from your Google Drive.
How To Share a Google Drive With Anyone
You can also share the contents of your entire Google Drive with anyone on the Internet. While it’s hard to imagine a situation where this would be necessary, we’re not here to judge – just to guide. To share your drive publicly, you’ll need to generate a link, set the access level, copy the link, and share it wherever you want your files to be available.
- Repeat the first three steps from the previous section to select all the files and folders in your drive.
- In the General access section, choose the option Anyone with the link.
- Select the access level for the link:
- Viewer: People can only view the files.
- Commenter: People can view and leave comments.
- Editor: People can view, comment, and make changes.
- Click Copy link and then hit Done.
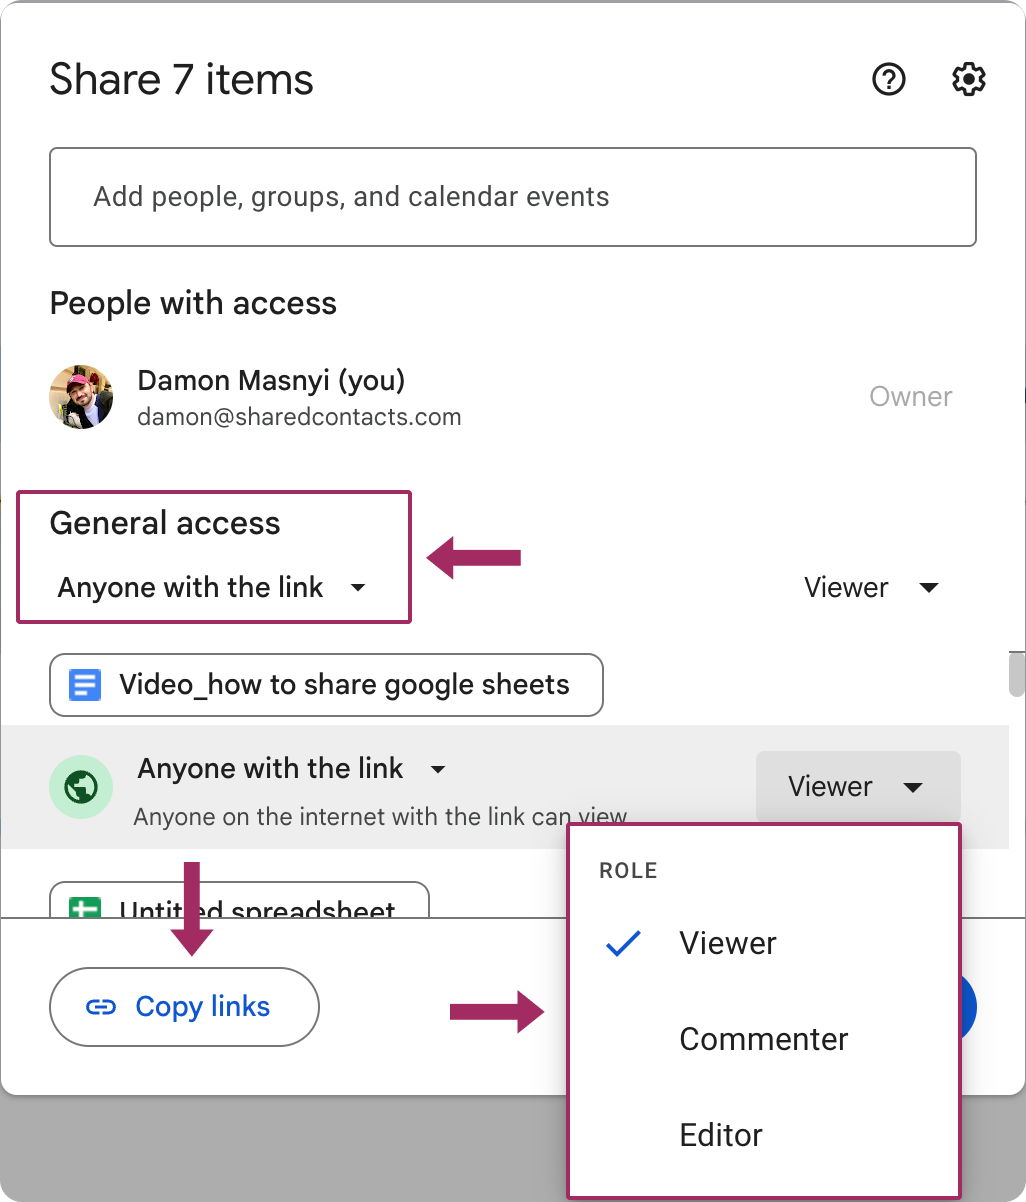
Important note: With this method, you won’t get a single link for your entire drive. Instead, each file will generate its own unique link. This can make managing and sharing links a bit tricky, so keep track of them carefully to avoid any unintended access in the future.
What is a Shared Drive?
There’s another way to share your files, and while the previous method can be familiar or more intuitive to many users, this one deserves more attention.
A Shared Drive is like a communal digital filing cabinet for teams or organizations. Unlike your personal Google Drive, which belongs to you, a Shared Drive is owned by your organization, and everything stored there stays put—even if a team member leaves the group. This makes it an excellent choice for long-term projects, company-wide resources, or any scenario where files need to remain accessible to various people over time.
When to Use a Shared Drive
- Team Projects: Perfect for keeping everyone on the same page with shared access to files, folders, and documents.
- Departmental Resources: Use it for storing templates, guides, or other materials that a team needs access to regularly.
- High Staff Turnover: Because ownership doesn’t depend on individual accounts, files stay in place even if someone leaves the team.
How to Create a Shared Drive
- Open Google Drive: Make sure you’re logged into a Google Workspace account (Shared Drives aren’t available for free Gmail accounts).
- Go to Shared Drives: In the left-hand menu, click on Shared Drives.
- Create a New Drive: At the top, click the + New or press the Create a shared drive button. Give your Shared Drive a name that reflects its purpose.
- Add Members: Click on Manage Members to invite people to the Shared Drive. Assign permission levels – Manager, Content Manager, Contributor, Commenter, or Viewer – based on their role.
- Set Folder Structure: Organize the Shared Drive with folders for easier navigation. You can upload existing files or create new ones directly in the Drive, including docs that you want to share with others.
- Share: Share links to specific folders or files within the Shared Drive as needed by clicking Done.
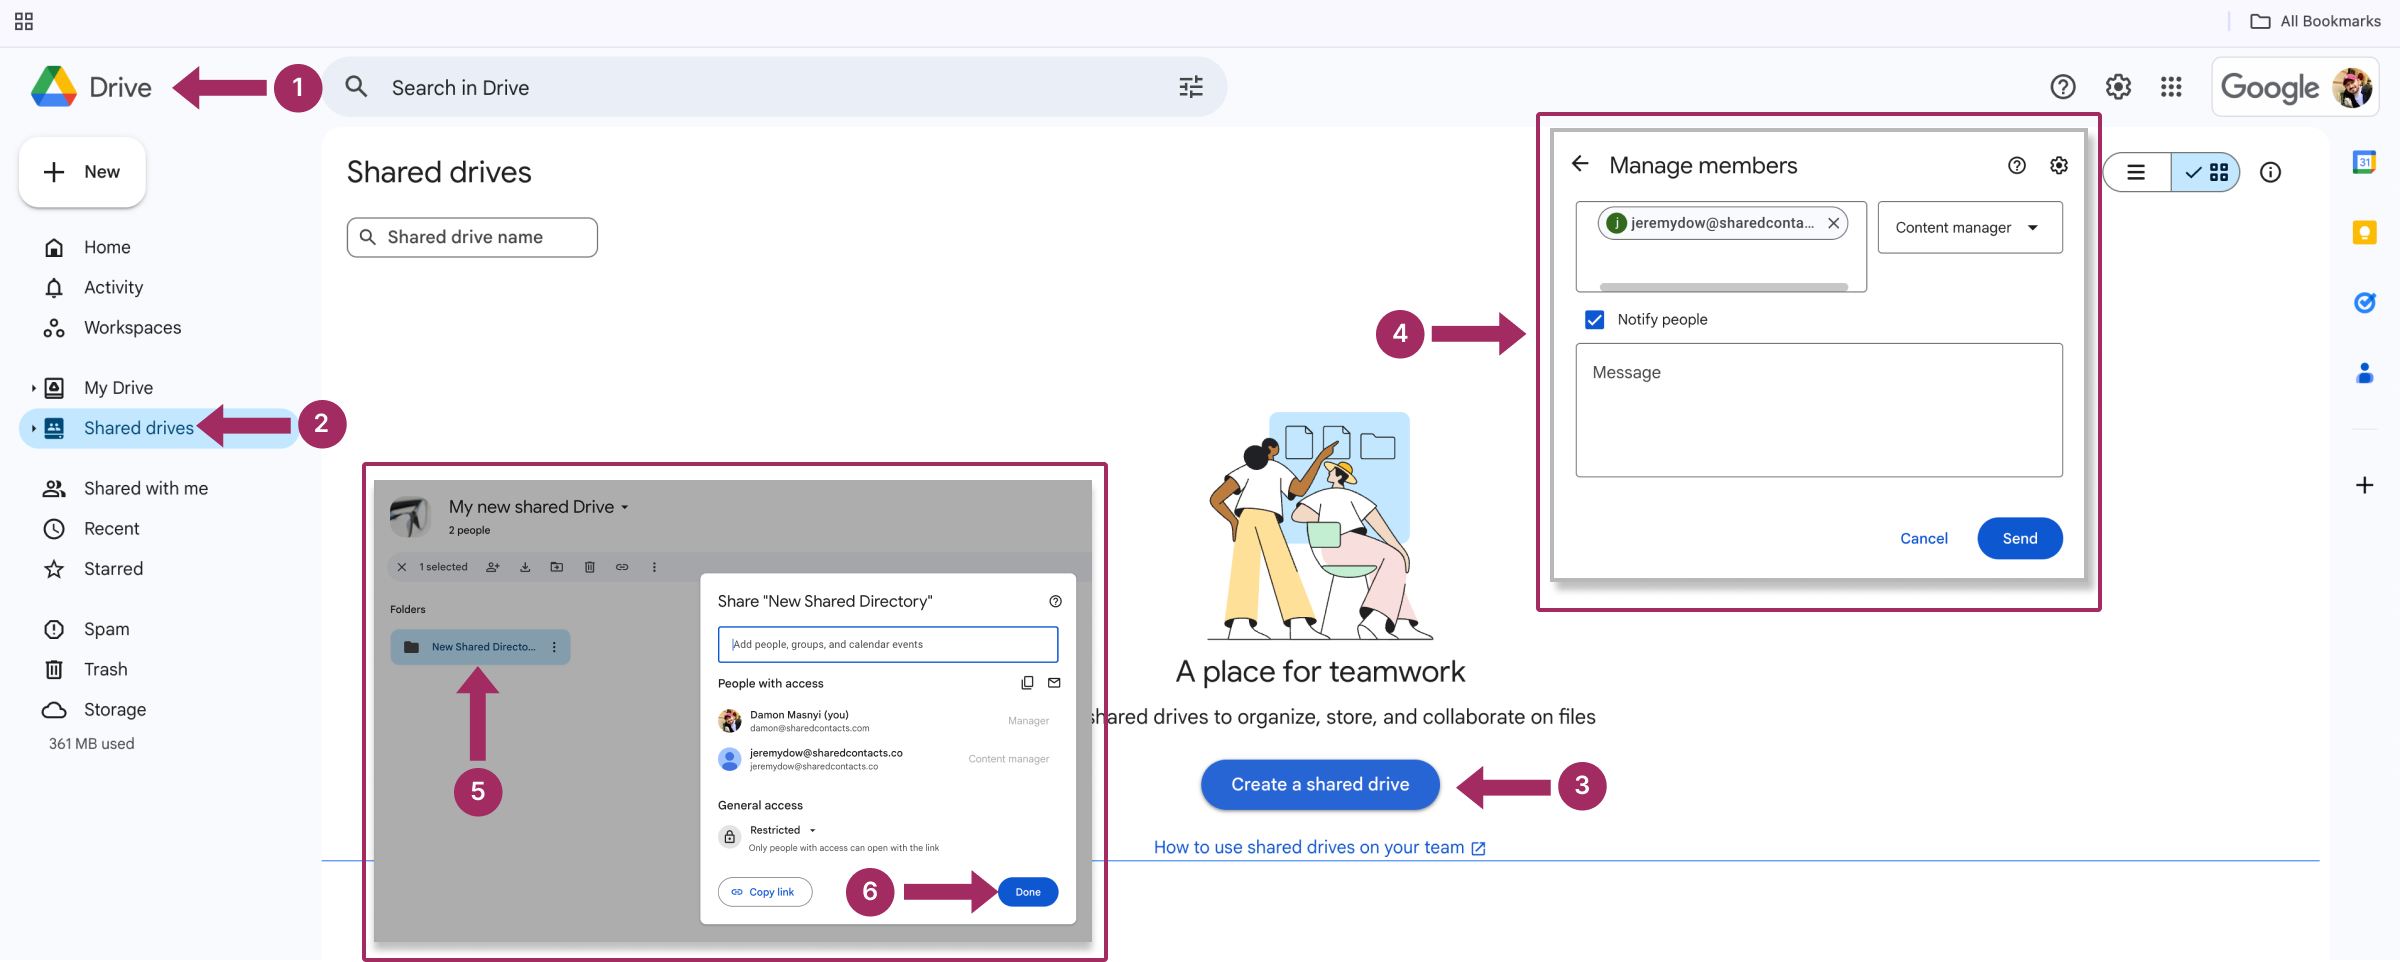
A Shared Drive simplifies collaboration by centralizing all relevant files in one place and maintaining consistency, even when team members come and go. If you run a tight ship (or a chaotic one that could really use some structure), it’s a solution for keeping everything organized and accessible.
How to Revoke Access to Shared Files
Sharing files is easy—but sometimes, access needs to be taken back. Maybe a project has wrapped up, a team member has left, or you accidentally shared something with the wrong person (yes, it happens). Whatever the reason, revoking access is a straightforward process in Google Drive.
- Locate the File or Folder: Open Google Drive and find the item you want to unshare.
- Open Sharing Settings: Right-click on the file or folder, then select Share from the drop-down menu.
- Remove Specific People or Groups: In the sharing pop-up, you’ll see a list of everyone with access. To revoke their access:
- Click the drop-down next to their name and select Remove.
- Alternatively, change their permission level to Viewer if you want to limit access instead of fully revoking it.
- Disable Link Sharing (if enabled): If you’ve shared the file via a link, click Anyone with the link and set the option back to Restricted to change permissions. This will prevent anyone with the link from accessing the file.
- Click Save to confirm.
Other useful things may also include these measures:
| Double-Check Permissions | Review the list of users to see if you haven’t missed anyone. |
| Use Expiration Dates | For temporary access, set expiration dates in advance, so you don’t have to revoke permissions manually. |
| Be Transparent | If you’re working with a team, communicate why access was revoked to avoid confusion. |
Sharing More Than Files: Why Shared Contacts Matter
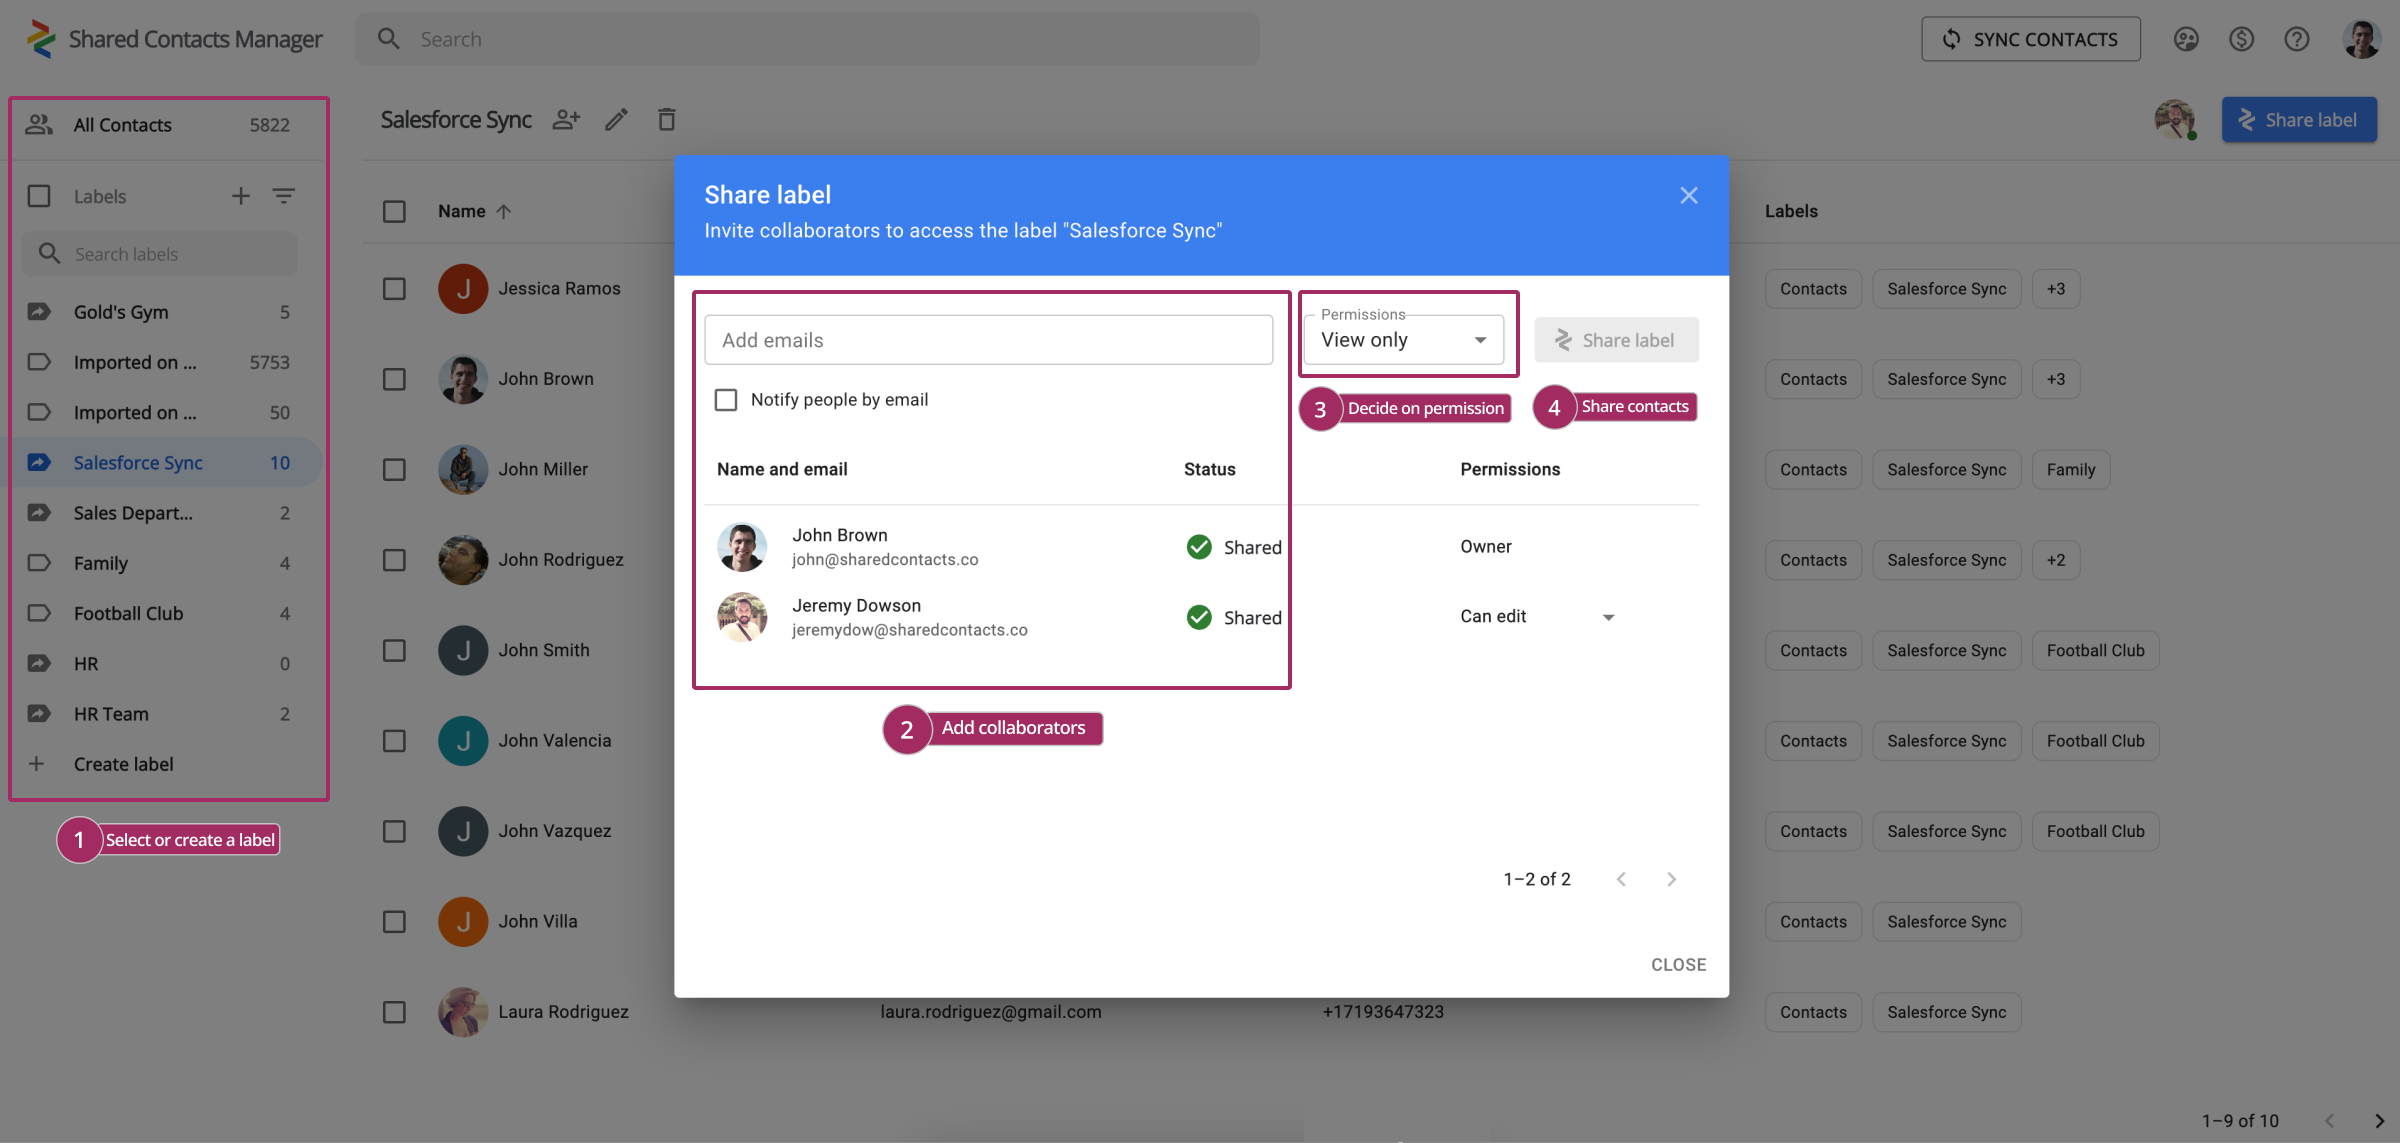
Sharing Google Drive files is a great way to collaborate, but collaboration often goes beyond sharing documents. How often do you need to share important contact information with your team, clients, or partners? Your answer will probably be “Way more often than I need to share my Google Drive.” When you’re working together with your team on a project and have shared all the necessary files in Google Drive, the next logical step might be sharing the relevant contact lists – such as clients, team members, or vendors. Missed contacts mean missed opportunities, and you don’t want that. That’s where Shared Contacts Manager steps in, helping you share and manage your Google Contacts just as easily as you share files in Drive.
This Google Workspace application is designed to improve your Google Workspace experience by allowing you to share contacts with the same precision as you share Drive files. Having shared access to contact lists saves you time and enhances your communication, which is paramount in business. With Shared Contacts Manager, you can easily share and manage these contacts across your organization.
Explore how you can take your collaboration to the next level by sharing contact lists with your team. Try Shared Contacts Manager free for 14 days now and save hours of work in the future.

No Comments