Verwalten und Freigeben von Kontakten mit Shared Contacts Manager - Das vollständige Benutzerhandbuch

Willkommen bei Shared Contacts Manager. In diesem Leitfaden erfahren Sie alles, was Sie über die richtige Verwendung der App zum Organisieren, Verwalten und Freigeben Ihrer Google-Kontakte wissen müssen. Wir helfen Ihnen in jeder Phase des Prozesses, von der Einrichtung der App bis zur Delegierung Ihrer Admin-Rechte an andere Nutzer.
Einrichtung
Die Installation von Shared Contacts Manager dauert nur ein paar Minuten. Folgen Sie diesen Schritten, um loszulegen:
- Gehen Sie zum Google Workspace-Marktplatz.
- Suche nach Shared Contacts Manager.
- Klicken Sie auf Installieren Sie.

- Folgen Sie dem Installationsassistenten und akzeptieren Sie die erforderliche Genehmigungen um die App mit Ihrem Google-Konto zu integrieren. Schließen Sie die Installation ab.

Wie man sich anmeldet
Nach der Installation haben Sie mehrere Möglichkeiten, auf die Anwendung zuzugreifen.
- Anmeldung über die Website: Weiter zu sharedcontactsmanager.com und klicken Sie auf das Mit Google anmelden in der oberen rechten Ecke.

- Verwenden Sie die direkte URL: Geben Sie in das Suchfeld Ihres Browsers https://sharedcontactsmanager.com/app und der Link führt Sie zur Anwendung.
- Melden Sie sich über das Google Apps-Bedienfeld an: Über das Google-Apps-Menü können Sie im Chrome-Browser schnell auf Shared Contacts Manager zugreifen. Klicken Sie auf das Google-Anwendungen und blättern Sie nach unten, um Shared Contacts Manager unter der installierten Software zu finden.

- Anmeldung über Workspace Admin Console (für Administratoren): Wenn Sie ein Administrator sind, können Sie direkt von der Google Admin Console aus auf die App zugreifen unter Apps > Google Workspace-Marktplatz-Anwendungen > Liste der Apps > Shared Contacts Manager.


Übersicht über das Dashboard
Die Oberfläche der Anwendung ist einfach, benutzerfreundlich und leicht zu navigieren. Sie ist in drei Hauptbereiche unterteilt:
- Kontakt Etiketten
- Kontakte Übersicht
- Verwaltung von Abonnements

Kontakt Etiketten
Auf der linken Seite, in vertikaler Anordnung, finden Sie alle Ihre Kontaktgruppen mit Ihrem Google-Konto synchronisiert. Wenn Ihre Kontakte nicht in Labels organisiert sind, erscheinen sie in einer allgemeinen Liste unter Alle Kontakte.
Sie können auch benutzerdefinierte Kontaktgruppen zur einfacheren Verwaltung und besseren Organisation Ihrer Kontaktdatenbank erstellen.
Um einen bequemen und schnellen Zugriff zu ermöglichen, können Sie Ihre Etiketten mit den folgenden Optionen filtern:
- Alphabetisch (A-Z)
- Alphabetisch (Z-A)
- Nach Erstellungsdatum (neueste zuerst oder älteste zuerst)
Außerdem können Sie die Anzeige von Gruppen auf der Grundlage bestimmter Attribute innerhalb bestimmter Kontaktgruppen anpassen.

Kontakte Übersicht
Im zentralen Bereich der Benutzeroberfläche werden alle Kontakte oder nur die Kontakte der ausgewählten Gruppe angezeigt. Jeder Kontakteintrag enthält wichtige Details wie den vollständigen Namen, die E-Mail-Adresse, die Telefonnummer und die Gruppen, zu denen er gehört. Sowohl für einzelne Kontakte als auch für Kontaktgruppen steht eine Reihe von Aktionen zur Verfügung.
Kontakt-Aktionen:
- Bearbeiten - Kontaktdaten ändern.
- Kopieren - Duplizieren eines Kontakts in andere Gruppen.
- Aus Label entfernen - entfernt einen Kontakt aus einer bestimmten Gruppe, ohne ihn zu löschen.
- Löschen - einen Kontakt dauerhaft entfernen.
Kontakt-Etikett-Aktionen:
- Benutzer hinzufügen - weisen Sie dem Etikett Kontakte zu.
- Umbenennen - den Namen des Etiketts ändern.
- Löschen - entfernt das Etikett.
Verwaltung von Abonnements
In der oberen rechten Ecke des Bildschirms finden Sie die Verwaltungstools für Ihre gemeinsamen Kontakte. Sie sind in drei Bereiche unterteilt:
- Verwalten von Benutzern
- Abonnement verwalten
- Unterstützungsoptionen.
Verwalten von Benutzern

In diesem Abschnitt finden Sie eine Übersicht über alle Benutzer der Anwendung. Sie können:
- Hier sehen Sie die Gesamtzahl der erworbenen Lizenzen, die Anzahl der zugewiesenen Lizenzen und die Anzahl der noch verfügbaren Lizenzen.
- Zeigen Sie alle Benutzer in Ihrer Domäne an und ermitteln Sie, wer eine SCM-Lizenz hat.
- Verwaltung von Benutzern, einschließlich Gewährung oder Entzug von SCM-Lizenzen.
- Weisen Sie zusätzliche Abonnement-Administratoren zu.
- Entfernen Sie Benutzer aus Ihrem SCM-Abonnement.
Abonnement verwalten

Der Bereich Abonnementverwaltung bietet einen umfassenden Überblick über den Status Ihres Abonnements. Hier können Sie die finanziellen Details Ihres aktiven Kontos einsehen, die Anzahl der Lizenzen anpassen, Zahlungsinformationen aktualisieren und das Abonnement bei Bedarf kündigen.
Optionen zur Unterstützung
Wenn Sie Fragen haben oder Schwierigkeiten mit der App auftreten, stehen Ihnen mehrere Support-Optionen zur Verfügung.
Beginnen Sie damit, die Wissensdatenbank in der App (oder die FAQ auf einer Website), die in Abschnitte gegliedert ist und ausführliche Antworten auf viele häufig gestellte Fragen enthält. Wenn Sie die gewünschten Informationen nicht finden, können Sie sich per Online-Chat an uns wenden, der fast den ganzen Tag über zur Verfügung steht. Die Verfügbarkeit hängt von Ihrer Zeitzone ab.
Wenn ein Chat-Operator nicht innerhalb von fünf Minuten antwortet, können Sie Ihre E-Mail-Adresse im Chat hinterlassen, und ein Support-Mitarbeiter wird sich mit Ihnen in Verbindung setzen.
Kontaktbeschriftungen erstellen
Google Contacts organisiert die Kontakte mit Hilfe von Etiketten, und Shared Contacts Manager folgt der gleichen Struktur.

So erstellen Sie eine neue Kontaktbezeichnung:
- Shared Contacts Manager öffnen.
- Klicken Sie auf das + oder drücken Sie auf das Symbol Etikett erstellen Taste.
- Benennen Sie Ihr neues Label.
- Klicken Sie auf erstellen..
Ihr neues Etikett ist fertig, und Sie können ihm nun Kontakte hinzufügen.
Hinzufügen von Kontakten zu einem Etikett

Nachdem Sie ein Label erstellt haben, folgen Sie diesen Schritten, um Kontakte hinzuzufügen:
- Shared Contacts Manager öffnen.
- Klicken Sie auf das Etikett wo Sie Kontakte hinzufügen möchten.
- Klicken Sie auf die Symbol Kontakte hinzufügen. Sie können Kontaktdaten hinzufügen, indem Sie entweder E-Mail-Adressen manuell eingeben oder Kontakte aus vorhandenen Google-Kontakten auswählen.
- Klicken Sie auf Kontakte hinzufügen. Ihre Kontakte sind nun unter der ausgewählten Bezeichnung gruppiert.
Kontakte mit Shared Contacts Manager teilen
Die Anwendung ermöglicht den Nutzern Google-Kontakte freigeben with selected individuals and domain groups. Here’s how to add users:
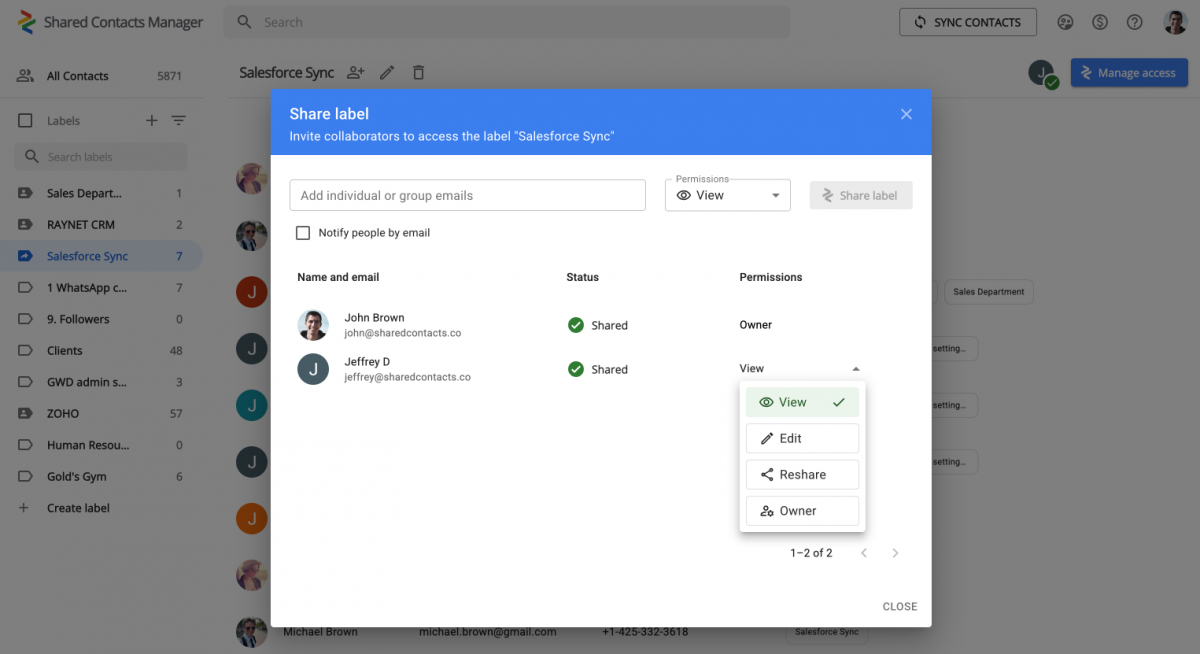
- Wählen Sie das Etikett die Sie teilen möchten.
- Klicken Sie auf Zugang verwalten in der rechten oberen Ecke.
- Geben Sie die E-Mail-Adressen der Benutzer ein, für die Sie die Kontakte freigeben möchten, oder wählen Sie sie aus der Dropdown-Liste aus. Sie können das Kästchen "Personen per E-Mail benachrichtigen" ankreuzen, wenn Sie die Benutzer per E-Mail benachrichtigen möchten, dass sie Zugang zu den freigegebenen Kontakten haben sollen.
- Anwenden einer der Benutzerberechtigungen – View, Edit, Reshare, or Owner.
Klicken Sie auf Etikett teilen abzuschließen und die eingeladenen Benutzer haben nun Zugriff auf die gemeinsamen Kontakte.
Optionen für die Benutzerverwaltung

Als Abonnementadministrator haben Sie Zugriff auf zusätzliche Verwaltungsfunktionen, insbesondere für die Benutzerverwaltung.
Um zu beginnen, klicken Sie auf das Symbol "Nutzer verwalten". In diesem Abschnitt werden Nutzer angezeigt, denen bereits eine Lizenz zugewiesen wurde, sowie andere Mitglieder Ihrer Google Workspace-Domäne. Die Spalte "Lizenz" zeigt an, ob ein Nutzer derzeit eine Lizenz besitzt.
Für jeden Benutzer können Sie:
- Sie zum Verwalter ernennen.
- Entziehen Sie die Administratorrechte.
- Erteilen Sie eine Lizenz.
- Eine Lizenz entziehen.
- Entfernen Sie sie aus dem SCM-Konto.
Um eine Aktion durchzuführen, wählen Sie den gewünschten Benutzer aus und klicken Sie auf das entsprechende Symbol.
Verwaltung des Abonnements

Das Fenster Abonnement verwalten bietet einen detaillierten Überblick über den Status Ihres Abonnements. Hier können Sie die aktuellen Abonnementdetails überprüfen, den Zahlungsplan einsehen und die Anzahl der erworbenen Lizenzen sehen.
In diesem Menü können Sie Zahlungsdetails aktualisieren, z. B. wenn Sie eine Kreditkarte ändern, zusätzliche SCM-Lizenzen erwerben oder Ihr Abonnement kündigen falls erforderlich.
Ähnliche Artikel

How to Export WhatsApp Contacts
How to Delete Contacts on Android – Complete Guide for 2025
Keine Kommentare