Manage and Share Contacts with Shared Contacts Manager – The Complete User Guide

Welcome to Shared Contacts Manager. This guide will walk you through everything you need to know about using the app properly to organize, manage, and share your Google Contacts. We’ll help you at every stage of the process, from setting up the app to delegating your admin privileges to other users.
Installation
Installing Shared Contacts Manager takes only a few minutes. Follow these steps to get started:
- Go to the Google Workspace Marketplace.
- Search for Shared Contacts Manager.
- Click Install.

- Follow the installation wizard and accept the required permissions to integrate the app with your Google account. Complete the installation.

How to Log In
Once installed, you have a few ways to access the application.
- Login from the website: Go to sharedcontactsmanager.com and click on the Sign In with Google button in the top right corner.

- Use the direct URL: In the search field of your browser, type https://sharedcontactsmanager.com/app and the link will take you to the application.
- Login from the Google Apps panel: The Google apps menu allows you to quickly access Shared Contacts Manager in the Chrome browser. Click on the Google apps icon and scroll down to find Shared Contacts Manager among the installed software.

- Login via Workspace Admin Console (for admins): If you are an admin, you can access the app directly from the Google Admin Console under Apps > Google Workspace Marketplace Apps > Apps list > Shared Contacts Manager.


Dashboard Overview
The application interface is designed to be simple, user-friendly, and easy to navigate. It is structured into three main sections:
- Contact Labels
- Contacts Overview
- Subscription Management

Contact Labels
On the left side, in a vertical layout, you’ll find all your contact groups synchronized with your Google account. If your contacts are not organized into labels, they will appear in a general list under All Contacts.
You can also create custom contact groups for easier management and better organization of your contact database.
For convenience and quick access, you can filter your labels using the following options:
- Alphabetically (A–Z)
- Alphabetically (Z–A)
- By creation date (newest first or oldest first)
Additionally, you can customize the display of groups based on specific attributes within certain contact groups.

Contacts Overview
The central area of the interface displays all contacts or only those within the selected group. Each contact entry includes key details such as full name, email address, phone number, and the groups they belong to. A range of actions is available for both individual contacts and contact groups.
Contact Actions:
- Edit – modify contact details.
- Copy – duplicate a contact into other groups.
- Remove from label – remove a contact from a specific group without deleting it.
- Delete – permanently remove a contact.
Contact Label Actions:
- Add Users – assign contacts to the label.
- Rename – change the label’s name.
- Delete – remove the label.
Subscription Management
In the upper right corner of the screen, you find your Shared Contacts Management subscription tools. They are divided into three sections:
- Manage users
- Manage subscription
- Support Options.
Manage users

This section provides an overview of all application users. You can:
- See the total number of licenses purchased, how many are assigned, and how many remain available.
- View all users in your domain and identify who has an SCM license.
- Manage users, including granting or revoking SCM licenses.
- Assign additional subscription administrators.
- Remove users from your SCM subscription.
Manage Subscription

The Subscription Management section provides a comprehensive overview of your subscription status. Here, you can review the financial details of your active account, adjust the number of licenses, update payment information, and cancel the subscription if needed.
Support options
If you have any questions or face difficulties with the app, several support options are available.
Start by checking the knowledge base in the app (or the FAQ section on a website) which is organized into sections and provides detailed answers to many frequently asked questions. If you don’t find the information you need, you can reach out via online chat, which is available most of the day. The availability depends on your time zone.
If a chat operator does not respond within five minutes, you can leave your email address in the chat, and a support representative will follow up with you.
Creating Contact Labels
Google Contacts organizes contacts using labels, and Shared Contacts Manager follows the same structure.

To create a new contact label:
- Open Shared Contacts Manager.
- Click on the + icon or press on the Create Label button.
- Name your new label.
- Click Create.
Your new label is ready, and you can now add contacts to it.
How to Add Contacts to a Label

Once you’ve created a label, follow these steps to add contacts:
- Open Shared Contacts Manager.
- Click on the label where you want to add contacts.
- Click the Add Contacts icon. You can add contact data by either entering email addresses manually or by selecting contacts from existing Google Contacts.
- Click on Add contacts. Your contacts are now grouped under the selected label.
How to Share Contacts with Shared Contacts Manager
The application allows users to share Google contacts with selected individuals and domain groups. Here’s how to add users:
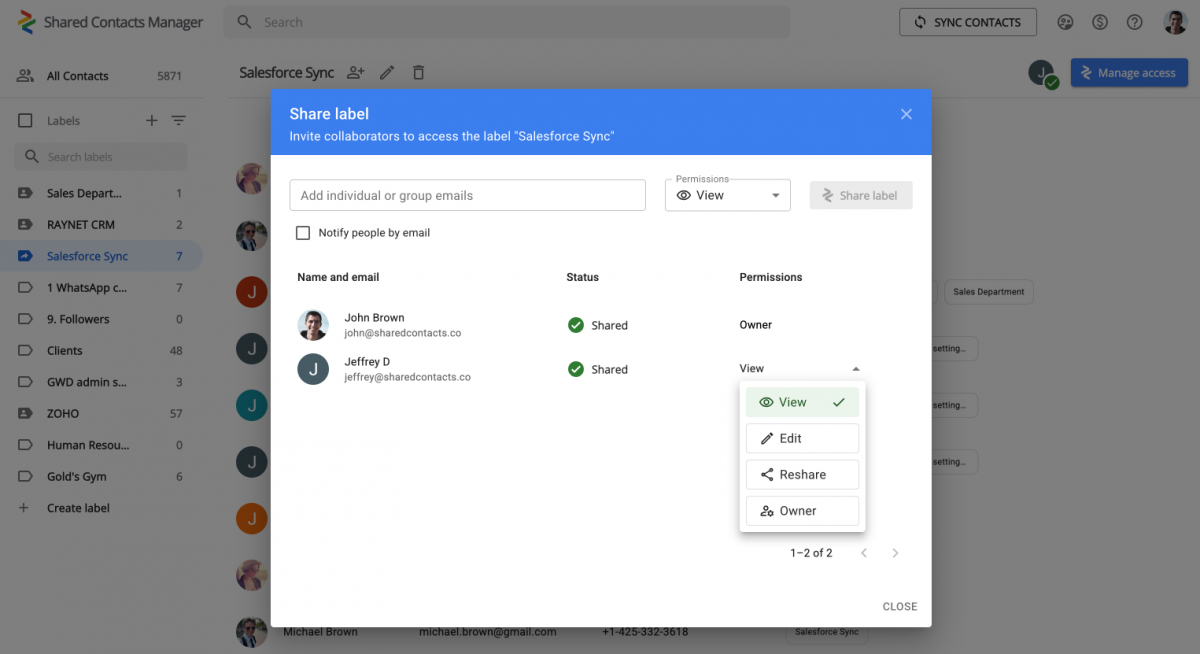
- Select the label you want to share.
- Click Manage access in the top right corner.
- Enter the email addresses of the users you want to share the contacts with or choose them from the dropdown list. You can check the box “Notify people by email” if you want to let the users know by email that they should have access to shared contacts.
- Apply one of the user permissions – View, Edit, Reshare, or Owner.
Click Share label to complete and the invited users will now have access to the shared contacts.
User Management Options

As a subscription administrator, you have access to additional management functions, particularly for user management.
To get started, click on the “Manage Users” icon. This section displays users who have already been assigned a license, along with other members of your Google Workspace domain. The “License” column indicates whether a user currently holds a license.
For each user, you can:
- Appoint them as an administrator.
- Revoke administrator rights.
- Grant a license.
- Withdraw a license.
- Remove them from the SCM account.
To perform any action, select the desired user and click the corresponding icon.
How to Manage Subscription

The Manage Subscription window provides a detailed overview of your subscription status. Here, you can check the current subscription details, view the payment schedule, and see the number of licenses purchased.
From this menu, you can update payment details, such as when changing a credit card, purchasing additional SCM licenses, or canceling your subscription if needed.
Related articles

How to Export WhatsApp Contacts
How to Delete Contacts on Android – Complete Guide for 2025
No Comments